Finally, we’re in last part of this tsunami effect blender 3d tutorial. If you reading this realistic wave and background/environment article by accident, I’m gonna summarize the other 3 tutorials on links below:
1. Hills landscape making.
2. Dry soil & beach texture.
3. Extreme wave & mist.
In this post we will add a realistic ocean material so it won’t look like a milk anymore.
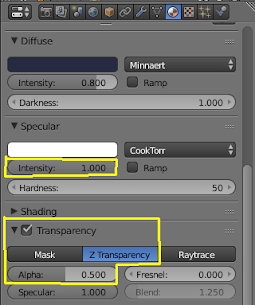
Select ocean object and on material editor set speculation: intensity = 1 so it’s shine a little bit and also make sure transparancy: alpha = 0.5 to make the object semi transparent. By the way, to avoid over working laptop, we won’t use reflection raytrace.
If you try to render it, the result will give you no realistic feel because no reflection and small wave details.

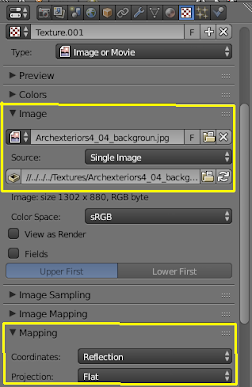
To change that, go to texture editor and pick Type = Image or Movie. For this task you have to provide a blue(ish) mountain png file. To give a natural reflection on water, active Mapping: Coordinates = Reflection.
Try render it again. Now you’ll see a fake reflection using this trick already apply. We’re just need to add a little bit details on this object.
Still in wave texture editor, create another texture, and set Type: Distorted Noise. Most important thing is the Basis: Size in small value, example 0.05, blend: add. To give bump look, change geometry: normal = 1.


Now, we need to create a background & environment so we’ll get a whole realistic scene.
Realistic Background and Environment in Blender 2.78:
For background, we will use the same blue sky texture. You already know how to add a new texture, right?. The only change you have to make is on mapping choose coordinates: view, and on influence check blend & horizon with its value 1.

But first if you want more dramatic blue sky, active environment lighting = sky texture on world editor.

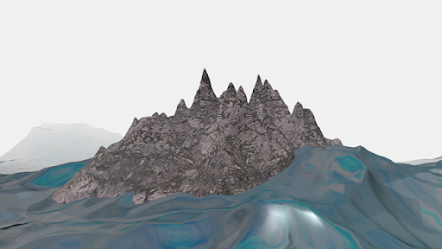
![[Blender 3D Tsunami Effect] Part 4: Realistic Wave and Background/Environment](https://lh3.googleusercontent.com/n2i3DyBW8xXifBWqHFTeKJDZmns9rB88Ov0GfTgVVAY6Th_-ZAIT_rzeOAFWCxiaAa5Cn9R0yCtj2_hsNiA_PqJsc1_P0E8yPc3pz9mGBXD3SX_OIZlLPCJ1Yy_-KY9tX5rV_wbc0wA_RwCgMoAZoA2e0Duqvk3w6HRaYYWFqBdwYrJMa0-HIcrUFxwfNJ-fKd6Kmr9VyKELjNQWD6P2zXZD7-NrxddQnNT6xwctlOlNyQ2vu2bKkkb15JUy00nJDKKIXZV77QZCCLjAEaiLY_ygY4TDMQgHJZ9FcFP-f3L-0blbKdGGYLbxlEL_yiVAuZqoWxO8HsIn3ZZP815UtAPCDxgYc5gn1f8Ai3TqceFjR4ulVxwwBnEl-tl8ULq9azZNdD6eesmuGf8W-FI7ejfaaxT4znAKH5uX2sDuBo9L-dfrV42NHVatMMHFxnkr_93pjUN1ER0BaWzsHFcvZrA4FDHe9TvkhWpVpVWVJe9VxaRck3oChg_axQtBLMZ3ZcRdtIB8ZlINWbTcxRS9UinFICFtXXjC35hRAoiOhVh10HSFlWZjCqAqVhudfw87Eg1KiST8UryeAd98AyALvB3gUWJjc8cdU0Qqwgvxq8gL687mhiBc=w542-h305-no)
That’s it!, the last part of this series. On next tutorial I’m torn between uv mapping a minecraft character or modeling a glassy object. Comment below which one you want to read. Cheers!.