If you reading this uv map rendering from referral link, I have to let you know that this post is the second part of Minecraft character uv mapping blender tutorial. You can read the first part here.
Open your previous work and press numpad 0 to bring camera view. On properties panel ( N ), check Lock Camera to View box.

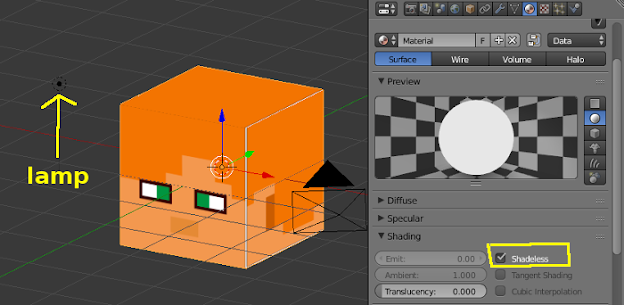
When you render it, the result is dark. That’s because we don’t have a lamp object. Add a Lamp —> Point then. Place the lamp on right position so it will light the face of our minecraft character. Next, active cube object and create a new material. On shading, check Shadeless box.
Render again, the cube will display/cover in white light image. To fix it, create a new texture, choose type = image or video. No need to upload a new texture pic, just click on browse texture to be linked icon and choose your uv mapping reference image. On Mapping option choose coordinates: UV and Projection: Flat. The render result is much better, right?.


If you want to bring back the shading, uncheck the Shadeless box on material panel. Copy object lamp and move it a little bit to the back. Change world background to any color you want and tadaaaaaa, now we have applied The Iron Golem face on cube object. Pretty cool, huh?.
![[Blender 3D Minecraft Character] Part 2: UV Map Rendering](https://lh3.googleusercontent.com/rhOLH7zTV4FbXuZtOY_jD-8JZ4ci0wAUkYi75zkoX6sjMVjah0zu_v9dtzcKn-HG3cs4HtmMmjtnDd91iL1Bs09-1CWfCKFNWELdFi3RrUkItK3XYWbmwCanXBAzVSbXXmvpOV2U_aAQAagcgE4Qb7-pv6-q49Kps614CEn-zl4TB0lY_K1_uuPnw5Amzc9mGJYaVWapYwfCMcB6c2zzIfMvXSQtJJLEjD2mMKndTDNi4Vak3HWvIMp88_R9vfKzGWzYDX7NepjQ8fVhn-LqhCL5IXf9g2O5lxJGOCTi-CAVJYZ-tNtterp4_hwirSaao6IKeeeju8vEJ4Wm1UW93gFCUqaF4nuG6eygSLwbBljGtWdU5yNjD7WINKxSA7jzynVRyvuqqX642W1ukKkLWjGAFpQrGGV5HBISo49cr313L2nEUNwese_KFNWRE871MOPsguykmiKj7RSRxDbgsI9uDRnM04TbBxfnaPBCTEn2K290y-pPpF862BACq5_QGuj6XK1sYeKdUJ-svlGIVggQUlfyBBv2BmRMacPHPQ4duufOKS9itZg-q94jUzN0Pqg7w7wLbHuPVhfGtU4EbZybCzpVVjOTxq7jHQIpUNJmKwU8Egfl=w756-h478-no)
For his body, hands, and legs you can approach them by simply add color material or use uv mapping technique. Hopefully this short blender 3D tutorial for beginner is useful for some of you. Comment below or contact me via Twitter if you have question. Hopefully I have the answer hahaha. Cheers!.