Okay, from my last blogging (blogspot) tips for beginner article, I mentioned Social Networking button is number widget to add on blogger/blogspot blog. Google doesn’t provide you the button on their list widget, that’s why you have to add them yourself. If you download free 3rd party template, they usually already installed. You just need to change the social networking username or ID. Here’s a little tips to find the code:
Change Social Networking Username/ID/URL on Blogspot:
1. On your Dashboard, choose Template. Then click EDIT HTML.
2. When your HTML window appear. Press Ctrl+F and find whichever Social Networking name. I usually just type Facebook or Twitter. All the button placed at the same code are. Something like this:
<div class=’social-profiles-widget’>
<a href=’http://twitter.com/USERNAME‘ target=’_blank’><img alt=’Twitter’ src=’http://2.bp.blogspot.com/-oFF4HrEbwaI/To9NpETr6dI/AAAAAAAAEJk/jowvXNvTKcY/s1600/twitter.png’ title=’Twitter’/></a><a href=’https://www.facebook.com/PAGES URL‘ target=’_blank’><img alt=’Facebook’ src=’http://4.bp.blogspot.com/-O6nMA1_akTo/To9NmwKzo4I/AAAAAAAAEJU/UFiFTyAJbnw/s1600/facebook.png’ title=’Facebook’/></a>
When you find it, change the social networking URL with yours.
If the designer didn’t include the social networking button when you download the template, you can add them yourselves. There are two option to do it. Both are easy and simple to apply. Follow this steps and choose which method you want to use.
1. Add Social Networking Button (HTML) Code on Blogspot.
From both method, this is the simple one. You just grab HTML code from Internet and add them by using blogspot gadget feature. Choose careful though, you don’t want add code that have malware. I search Internet and found this code from mbgadget, tested it, and I think it’s safe to use it.
1. From blog dashboard, go to LayOut
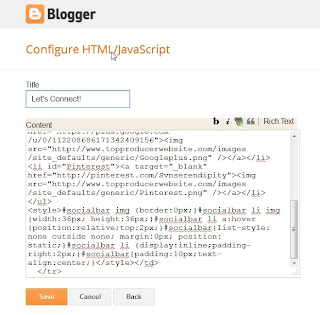
2. The perfect place to place the button is on the top of sidebar. So, choose add gadget on sidebar. Click HTML/JavaScript, and copy-paste code below on its window:
<tr>
<td width=”245″ height=”35″> <!– START SOCIAL MEDIA WIDGET –><ul id=”socialbar”>
<li id=”facebook”><a target=”_blank” href=”https://www.facebook.com/PAGE URL“><img src=”http://www.topproducerwebsite.com/images/site_defaults/generic/facebook.png” /></a></li>
<li id=”twitter”><a target=”_blank” href=”http://twitter.com/USERNAME“><img src=”http://www.topproducerwebsite.com/images/site_defaults/generic/twitter.png” /></a></li>
<li id=”Googleplus”><a target=”_blank” href=”https://plus.google.com/PLUS URL“><img src=”http://www.topproducerwebsite.com/images/site_defaults/generic/Googleplus.png” /></a></li>
<li id=”Pinterest”><a target=”_blank” href=”http://pinterest.com/USERNAME“><img src=”http://www.topproducerwebsite.com/images/site_defaults/generic/Pinterest.png” /></a></li>
</ul>
<style>#socialbar img {border:0px;}#socialbar li img {width:36px; height:36px;}#socialbar li a:hover {position:relative;top:2px;}#socialbar{list-style: none outside none; margin:0px; position: static;}#socialbar li {display:inline;padding-right:2px;}#socialbar{padding:10px;text-align:center;}</style></td>
</tr>
3. Now View Blog
2. Add Social Networking Button on Blogspot by Hosted Them on Photobucket.
Sometimes when you apply method #1, you don’t feel the buttons are blend with your template so you looking more buttons with the design you like. You can search and download them for free, and later hosted them on photobucket. This method is need a little extra time, but I’ll show you how. Carrie Loves is kind enough to give us 34 awesome free social networking button for free!.
Now follow the steps below how to hosted the buttons on photobucket.
1. If you haven’t register to photobucket, please do. Photobucket is a free image/video host. You can grab the HTML code, direct link, etc from image/video you upload there and embed to your blog.
2. Upload the buttons that you already downloaded. When your upload image finish, click on image to get its HTML, direct link, etc. Copy the HTML code on sidebar and paste to notepad file. See the pics below:
<a href=”http://twitter.com/USERNAME” target=”_blank”><img src=”http://i887.photobucket.com/albums/ac73/svnserendipity/blog/twitter_zps00730a8f.png” border=”0″ alt=” Follow Me on Twitter”/></a>
3. Repeat step 2 for every social networking button you want to use.
4. Let’s just assume you already paste all social networking button HTML code on Notepad. Copy and paste the codes on HTML/Javascript gadget window.
5. Now View Blog
It’s actually a very simple procedure, you just need to repeat the steps for every button you upload. Ask me a question if you still confuse.

