From one blender 3d tutorial series to another blender 3d tutorial series. After you know to make a dramatic lighting, now we’ll create an architecture object, a house. We only want make a simple house from cube with precision in meters unit. In this first part, we’ll planning and modelling a wall without add on.
Planning:
Open Scene Editor and set the scene unit in Metric.

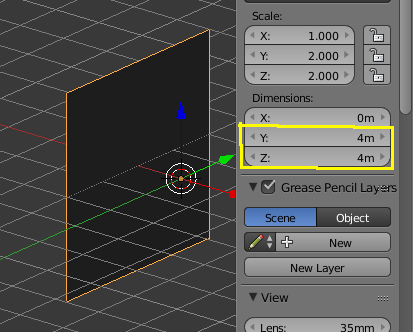
Change the grid value on Properties panel (N) like picture show:

Lines: The length and width scene grid is 30m x 30m.
Scale: The smallest grid is 1 meters.
Subdivision = 5: The largest grid is 5m x 5m.
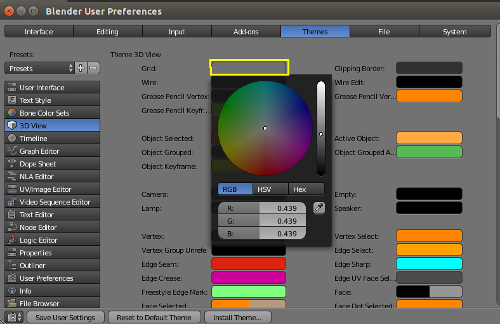
If you want to make the grid more lighter or darker, go to File —> User Preferences —> Themes —> 3D View.
Modelling:
There is no automatic wall model in blender 3d except you use Archimesh addon. In this tutorial, we will build a wall manually. Somehow, I like this way than use an addon.
Create a cube object and delete 5 faces until you only have 1 face left.

I want the wall to have 4m heights. So i change the Z value.
Move the plane 2m by Z Axis, so the bottom edge sit on base grid.

By the way, I have change the length of the original wall to 6m. Now, I want to make another 5m wall on X Axis. I’ll approach with select the Edge first, Extrude, press X, and press 5. Done.

Basically, you only have to repeat this process everytime you make a new wall. Using value below, go create new walls.
Y Axis: -6.
X Axis: 5.
Y Axis: 12.
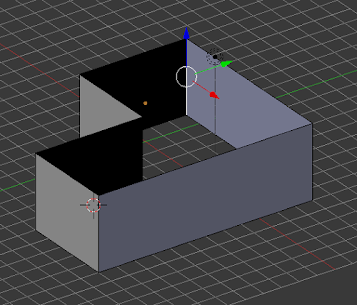
Grab the last edge to original wall. The result should be like this:
From this method, there is a possible you make doubles vertices. Remove them by select all (A) and click Remove Doubles button.
Wall Distance (Protractor):
Just like Sketchup, blender 3d also have a Protractor feature that measure the distance and angle. But first, back to object mode.
On Grease Pencil tab, click on Ruler/Protactor. Pay attention to help shortcut on bottom panel. To make sure the distance is right, press Ctrl + Drag from one wall —> Shift + Drag to another wall.

Press Escape to make all the protractor dissapear.
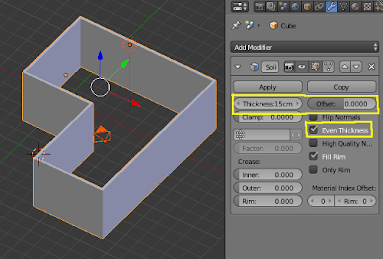
Wall Thickness (Solidify):
To add some thickness on our wall, we can use Solidify modifier. But, before we add it, we have to remove the transformation pattern first. Ctrl + A —> Rotation & Scale.
Now, go to add Solidify modifier with the details below:
Important Note:
What if you want to add another new wall again. Don’t use only the Extrude command, because your new wall won’t have thickness.
Select the edge, duplicate it (Shift + D), press Extrude (E), and drag it to next position.

That’s it!. It’s more easy if you have the home plan layout as a references picture. Don’t forget to subscribe and join this blog because next tutorial we will make a hole for window and door.