With this Modeling Wall Clock in Blender 3D tutorial, we will learn about circular duplication with array from certain angle. Also we will add a 2d object that we can turn to 3d object. This learning project probably looks easy for you, but in the process of making we need a few trick so our wall clock will have a clean, precision, and also measurable.
Here’s a few things that we will learn during this practice:
- Modifier: Array: Fit Count, Fit Length, Relative Offset, Constant Offset.
- Border Selection.
- Object Text & Font.
- Duplicate Object.
By the way, I won’t show you a how step by step instruction because that will make a very long post. I will assume you already know how to add a new object, enter transformation/edit mode, know where to find each slot in properties panel, how to select mode ( Ctrl+TAB ), change the object dimension, etc. Basically all the beginner command, okay?.
Let’s get started then!.
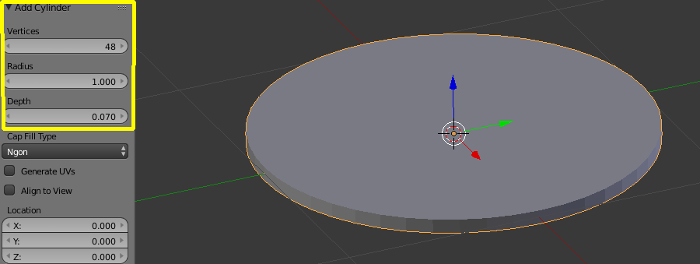
1. Create a cylinder object with dimension show below:
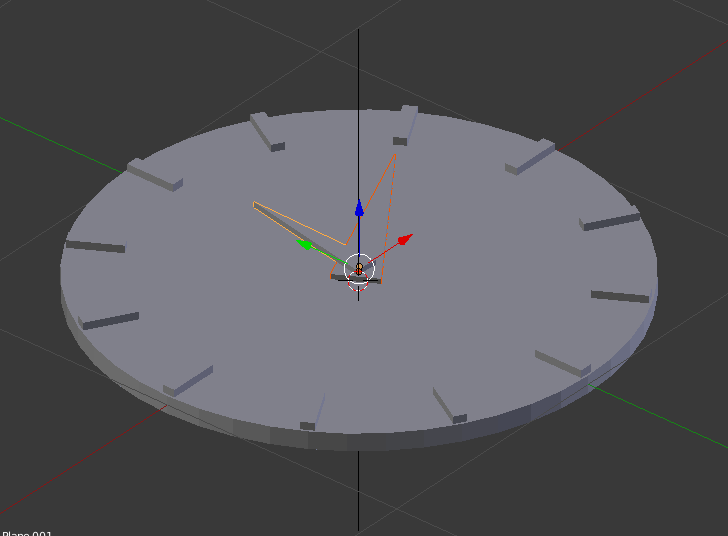
2. Add a cube for clock notation, change the dimension to proper size, place it in the top where the 12 is. Don’t forget to erase the edit path with Ctrl+A —> Rotation & Scale & Location so we don’t have a messy modifier result.

3. Make sure the 3d cursor is in the middle of clock because we will add empty object with shortcut: Shift+A —> Empty —> Plain Axes. Add Array modifier and change the Z Rotation angle on Object Data to 30 degrees. See settings below for guidelines:

4. Now we will make 2 clockwise from plane object. Edit the plane so it shape like clockwise and duplicate it. Scale the second clockwise, make it smaller. Give it thickness by extrude both clockwise.
What next?. Now we will create clock frame.
How to Create A Wall Clock Frame in Blender 3D:
We will model our clock frame from circle object. Again make sure the 3d cursor place in the middle of clock object, press Shift+A —> Mesh —> Circle. The circle will have a same size as our clock. Select the circle, enter Edit Mode, select mesh mode vertex, make sure your pivot is individual origins, and the final step is extrude the vertex to proportional size like I did below:

You can change to face mesh mode or still in vertex and next extrude them along Z axis like this:

How to Add Text Font in Blender 3D:
The process to create a text is just the same as create cube, different is you choose text on the option. Type the brand of your clock and if you want to change the font type, go to font slot, search your .ttf on regular option. On Edit mode you can change the word and if you want to give it extrude change it from font slot on geometry area.

This tutorial is getting longer than I expected. So I have decided to split it in two part. On next blender tutorial I will show you how to apply material using UV Mapping method and add constant lamp. Be patient, subscribe, and don’t miss my next post. See ya!.