After you know how to apply uv map on cube object, now it’s time to learn to use this technique on cylinder object. And for this practice I choose ice cream packaging. For non cube object we have to use Mark Seam technique, which is a cutouts area with object put in the same/flat level. We also will learn making a shadow background so it’s mix with background bitmap. It will be in part 2 of this tutorial series.
1. Cylinder Preparation.
Open your blender software, delete the cube object, and add cylinder object. Bring the tool shelf ( T ), and make the cylinder smooth.
If you reading this uv map rendering from referral link, I have to let you know that this post is the second part of Minecraft character uv mapping blender tutorial. You can read the first part here.
Open your previous work and press numpad 0 to bring camera view. On properties panel ( N ), check Lock Camera to View box.
I’m sure some of you is familiar with this Minecraft character name The Iron Golem. I have to admit though, I’m not a gamer. So it was a quick google research hahaha. Anyway, this cube, uv image editor, and uv mapping will show you how to add images on 6 side of a character head. The technique we will use called a simple uv image editing and seamless.
But, first you need to provide an image that have 6 side of head like mine below:
Finally, we’re in last part of this tsunami effect blender 3d tutorial. If you reading this realistic wave and background/environment article by accident, I’m gonna summarize the other 3 tutorials on links below:
In this post we will add a realistic ocean material so it won’t look like a milk anymore.
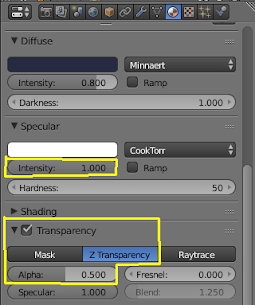
Select ocean object and on material editor set speculation: intensity = 1 so it’s shine a little bit and also make sure transparancy: alpha = 0.5 to make the object semi transparent. By the way, to avoid over working laptop, we won’t use reflection raytrace.


![[Blender 3D Minecraft Character] Part 1: Cube, UV Image Editor, and UV Mapping](https://lh3.googleusercontent.com/vUN1jO15MC8neP-KW9mCMrShNBCdMaPl4FXYQvUWEHSaqTNmHRxijBm6esL8uICXUWfsdcJJWg1odX7WUkkHS7HPR2y2KUXdFneh0vZPRIVK6mn3v4IRuWyVBMLPPI53zJ9os8Iss8MspKvJX4UqS_Lvgzuag1SqUHa87zltLLeykALMQQfNGsJiM9JJwSi7l3QfS2ZxjcfparWkCT9ZAPUxLe6OEBxL8MKx_xwPMQDSm58n62lYGmDazOTDlzMS-QA9Zr0R5VSfDkHHfpApKUXXTOFFi4rg6EplQYMHYzboMTGGQ9KYTLjzHbcUbHWVKMNm_688w7QRfV5eBu72FlYGTi2xJnNT6DLZysWM9rowQmQFHqMEHrK7oE0dMbtv8q3B1FvhSNnQKLll6_SGD1wyfdfbwsnRYznz9uqPSrdnqk9G7LvFe0G69HKgiEBowLV_gweYbvHQmi0hbjw7uzxqWhSAASbOr1yFx9jYsaZraC1dIVXUYRvEj84ZsBFtmGejaWONMFMDRLiaSbZKoXOmNxG32m04NBDR1t9hW_2hys_vBr3FN6jN7w6F6v5i9tmUZj5FtnMMQ4jhutW6E2DqxtTkaZJInb9cYH-lfRInL9SXfkc8=w360-h509-no)