Using our previous project, wall clock, now we will learn how to create a material using UV Mapping & Constant Lamp in Blender 3D. Artist usually use UV Mapping if they want to achieve more realistic render result. It’s more complicated process, but the end result won’t disappointed you.
This blender 3d tutorial for beginner will show you the very basic steps of how to apply uv mapping material on object. If you already understand the principle of its process, you can play more with this feature.
For the purpose of this practice, we will create a wall for our clock. Make your view from front view, create a plane object, rotate our clock to 90 degrees X axis, and then place our clock on plane face.
With this Modeling Wall Clock in Blender 3D tutorial, we will learn about circular duplication with array from certain angle. Also we will add a 2d object that we can turn to 3d object. This learning project probably looks easy for you, but in the process of making we need a few trick so our wall clock will have a clean, precision, and also measurable.
Here’s a few things that we will learn during this practice:
Modifier: Array: Fit Count, Fit Length, Relative Offset, Constant Offset.
Border Selection.
Object Text & Font.
Duplicate Object.
By the way, I won’t show you a how step by step instruction because that will make a very long post. I will assume you already know how to add a new object, enter transformation/edit mode, know where to find each slot in properties panel, how to select mode ( Ctrl+TAB ), change the object dimension, etc. Basically all the beginner command, okay?.
Let’s get started then!.
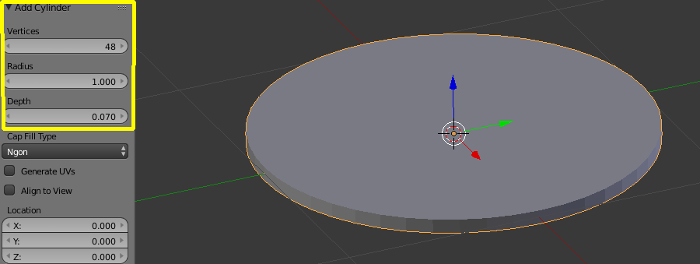
1. Create a cylinder object with dimension show below:
Hey ya guys, we met again. We’re still on staircase topic though :). Straight staircase is done and now let’s try with spiral staircase. We will still use array modifier with a little help from empty object and apply/rotation feature in Editor Object Data. Our spiral stair will look like that DNA Helix.
At this point I assume you already know how to add new object and transform its dimension, alright?. So make a cube object and change the dimension to X: 1.2 m; Y: 40 cm; Z: 5 cm.
Now we will dig to more specific steps.
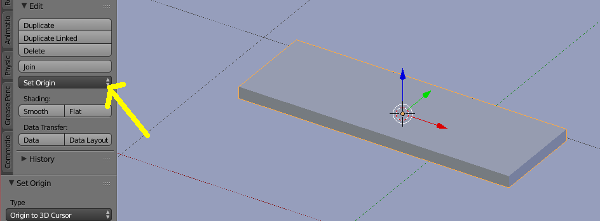
I want you to make sure the pivot point and 3d cursor place in the middle of our stair count object. Click on the object and enter edit mode ( TAB ). And then press Shift+S and choose Cursor to Selected. Back to Object Mode and on Tool Shelf click Set Origin —> Origin to 3D Cursor.
Hey youuuuu. How’s your day?. I hope you still have time to read this new blender 3d tutorial for beginner. After we learned how to create a chair in blender, now we will step up a little bit by starting learning a modifier. This time we will learn about Array modifier, and what’s the best practice than build a staircase, right?. It’s just a simple straight staircase, so this tutorial should be short and easy to follow.
Maybe, I will show how to add material on that staircase as well. We’ll see, okay?. :p. Okay, let’s start, shall we?.
1. Create a cube object by using shortcut Shift+A, and set the dimension to X:1.2m; Y:40cm; Z:5cm, so it will look like this: